Software testing, for embedded or for native solutions, can seem like a headache, but it doesn’t have to be!
Of course, there are challenges. Time and resource limitations can restrict the level of testing, and it is difficult to simulate all real-world scenarios and corner cases. This can lead to defects being found in the phase where they are most expensive to fix, post-release.
Because testing is such a critical step in delivering fully functional and reliable solutions to market, setting up and maintaining a testing regime can be time-consuming, complex, expensive and justifiably so. Occasionally and unfortunately, business pressures can mean testing gets minimized, or at least de-emphasized, which only pushes the problem into the future. This is a solution to be avoided because it is a problem that WILL come back.
The benefit of a comprehensive software test solution is probably obvious, but let’s take a quick look. To start, a good testing methodology helps to find and fix bugs in our code in a timely manner. Removing bugs avoids functional failures in the field, as well as reduces (but rarely eliminates) the risk of security vulnerabilities. Maybe more importantly, it can help to avoid costly negative customer products reviews.
From the perspective of a development team, software testing ensures we deliver the specified functionality, in normal use as well as corner cases, and ultimately helps deliver a reliable product to market that we can be proud of.
So what types of testing are available to us?
- Unit Testing: individual components or units of the software are tested in isolation to ensure correctness and functionality. These units could be single functions or wider more complex algorithms but will typically build over time during a development cycle. Instruction simulators or in-circuit debuggers can be used for unit testing based on the need for MCU peripheral interaction. For pure computational functionality, an instruction set simulator such as SEGGER emSim is ideal. I will discuss this in more detail later.
- Integration Testing: As the development starts to build, we move into the Integration test phase, where more complex multi-function algorithms need to be tested. Similar principles to unit testing can be used here but a move to in-circuit testing, such as J-Link commander, is more common as access to MCU peripheral functionally becomes essential.
- Functional Testing: This type of testing evaluates whether the software meets the specified functional requirements. It involves testing different features and functions of the release software. This may be automated depending on the complexity of the user interface
- Regression Testing: Regression testing ensures that new changes or updates to the software do not adversely affect existing functionality. It can include all of the above methodologies.
- User Acceptance Testing (UAT): UAT involves testing the software with end users in mind to ensure that it meets their needs and expectations.
Let’s take a quick look at Unit testing
To conduct effective unit testing, certain best practices should be followed. Test cases should cover a range of scenarios, including typical use cases plus edge cases. Tests should be automated, enabling them to be executed frequently without manual intervention.
As mentioned earlier, the ability to use an instruction set simulator such as SEGGER emSim enables testing on the correct embedded architecture rather than relying on, for example, a PC application that may hide issues such as variable sizes and library constraints.
So how can we set up a simple unit test using emSim?
The first step is to download and install the latest release of Embedded Studio as this includes a full development suite (editor, compiler etc.) and more importantly, emSim. Embedded Studio can be used for evaluation without limitation on Windows, macOS, and Linux platforms. It is available for commercial use under various, flexible licensing models.
Next, we write the functionality to be tested and wrap it in unit tests. Below is an incredibly simple example to increment a char and test the returned value. We may expect this to work with all inputs to the function but the logic will fail when the 8 bit char wraps.
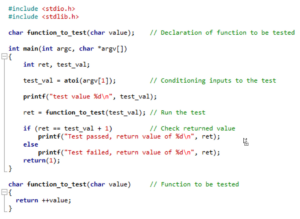
where function_to_test() is the code under test and is called by the pre-conditioned test_val that has been passed into the unit test from the command line. The returned value ret is then tested for the desired value, in this case an incrementation of the variable passed into the tested function.
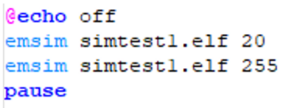
The next step, once the unit test is working as desired, is to prepare a script to test a range of input values. One example is as below, however this could also be built into the unit test itself:
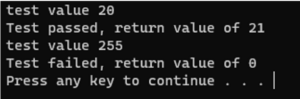
which returns the following that could be further processed as needed.
The final step, should you wish to integrate unit testing on real target hardware, is to move to a scripted emSim test configuration based on J-Link debug probes that will give you access to on chip and external peripherals as needed. For more information, please see this link.
It is also possible to extend the testing by setting breakpoints to exit tests and generate instruction trace output. Please see the online help pages in Embedded Studio about emSim
About emSim
As mentioned emSim is supplied as part of SEGGER Embedded Studio running on Windows, MAC and Linux platforms and includes support for a wide range of Arm architectures including arm64, v4t, v5te, v6, v6m, v7m, v7em, v7r, v7a, v8a, v8r, v8m_baseline, v8m_mainline, v8.1m_mainline which can be configured by adding -arch to the command line.
Using emSim gives you an easy entry into the world of unit testing based on the host platform and target architecture that best suits your requirements.
Enjoy.