AppWizard is a great tool for designing GUIs with our emWin embedded graphics library. Features like the intuitive editor, the integrated resource management, and the ability to add behavior to the screen objects by adding interactions make it easy to get started with emWin.
But you can create even more advanced graphics solutions by extending an AppWizard-generated GUI with the full library of widgets available in emWin using the emWin API. In this article, we’ll take a look at how to do this.
Getting to know the AppWizard screen callback routines
To answer the question of how to add an emWin widget to an AppWizard screen, we have to take a closer look at the AppWizard screen callback routines.
For every screen in the GUI, AppWizard generates a callback routine called cb<ScreenID> (e.g. cbID_SCREEN_00). It can be found in the slot routine file <ScreenID>_Slots.c, located in the AppWizard project directory \CustomCode
\Config\. By default, it is empty and looks like this:
/*********************************************************************
*
* cbID_SCREEN_00
*/
void cbID_SCREEN_00(WM_MESSAGE * pMsg) {
  GUI_USE_PARA(pMsg);

}
A screen callback can react to various types of messages that are sent to the screen via the emWin Window Manager (WM). The data structure WM_MESSAGE contains the message data. The emWin User Guide shows us the type definition of this data structure:

Two of the most important message types (see WM_MESSAGE structure member Msg_Id in the table above) are:
- WM_INIT_DIALOG: A message sent to the screen callback immediately after the screen is created and before it is displayed.
- WM_NOTIFY_PARENT: A message to inform the screen (i.e. the “parent”) that an event that has occurred in one of the objects on the screen (i.e. one of its “children”). The event details are provided as a notification code.
Let’s consider an AppWizard screen with three widgets on it and a screen callback:
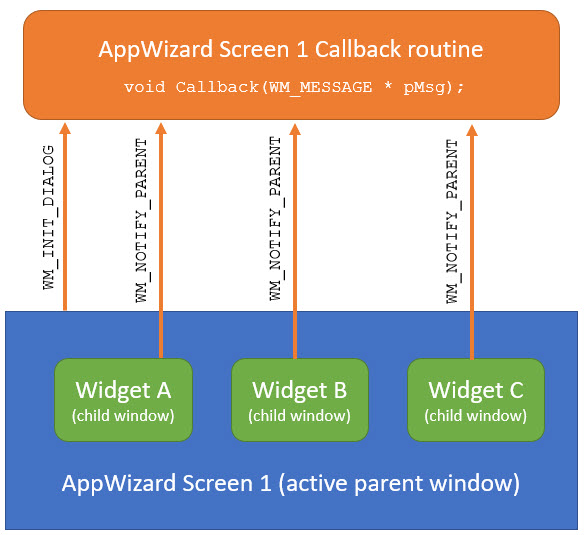
The interesting thing is: The moment the WM_INIT_DIALOG message is received by the callback is the perfect time to place additional widgets on the screen, which is what we want to do.
The other part to note here is that the screen callback does not only get called by the screen object itself. It also receives messages from other objects on that same screen, like buttons, sliders, rotaries, etc.
Therefore, a screen callback routine needs to figure out the following:
- What is the type of message that is being sent to the callback?
(WM_MESSAGE structure member Msg_Id) - In case of a WM_NOTIFY_PARENT message:
- Which object on the screen is sending the message to the callback function? (WM_MESSAGE structure member hWinSrc)
- Which event triggered the message? (WM_MESSAGE structure member Data.v)
A typical screen callback routine, therefore, has the following structure:
void cbID_SCREEN_00(WM_MESSAGE * pMsg) {

   WM_HWIN  hWin;
   int      Id, NCode;

   // Determine which type of message was sent to the screen:
   switch (pMsg->MsgId) {

   case WM_INIT_DIALOG:
      // Add extra widgets to the screen and initialize them:
      ...
      break;

   case WM_NOTIFY_PARENT:
      // Determine the Id of the widget that sent the message:
      Id = WM_GetId(pMsg->hWinSrc);

      // Determine the notification code of the event that took place:
      NCode = pMsg->Data.v;

      switch(Id) {           // Which widget caused the message?

      case GUI_ID_WIDGET_A:
         // Get the handle for Widget A:
         hWin = WM_GetDialogItem(pMsg->hWin, GUI_ID_WIDGET_A);

         switch(NCode) {     // Which event caused the message?

         case WM_NOTIFICATION_CLICKED:
            // Update Widget A using its handle:
            ...
            break;

         case WM_NOTIFICATION_RELEASED:
            ...
            break;
         }

      case GUI_ID_WIDGET_B:
         switch(NCode) {
          ...
         }
         break;
      }
      break;
      ...
   }
}
Note: You can find the full list of window messages and notification codes in the emWin User Guide & Reference Manual.
Now that we are armed with this background information, we can get to work.
Adding a Progress Bar to an AppWizard screen
Let’s say we want to extend a screen designed with AppWizard with an emWin progress bar widget.
In the emWin user guide, we can see that the API call that creates a progress bar looks like this:
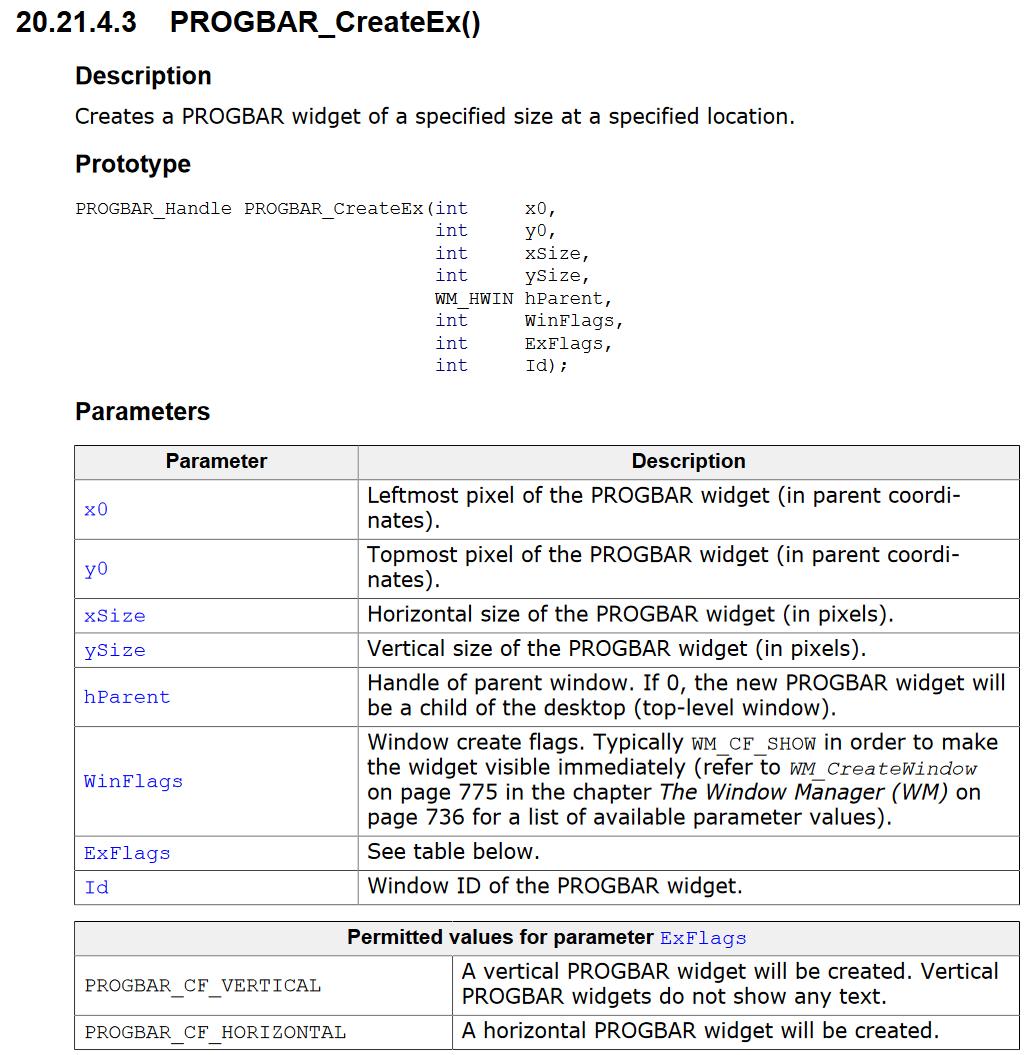
Consequently, the following line of code creates a horizontal progress bar that is 200 pixels wide and 30 pixels high, with the Id “GUI_ID_PROGBAR0”, to be made visible immediately on the current screen at x-coordinate 245 and y-coordinate 70:
PROGBAR_CreateEx(245, 70, 200, 30, hParent, WM_CF_SHOW, PROGBAR_CF_HORIZONTAL, GUI_ID_PROGBAR0);
To add our progress bar to an AppWizard screen with the Id ID_SCREEN_00, we will use the appropriate slot in the screen callback routine:
void cbID_SCREEN_00(WM_MESSAGE * pMsg) {

   PROGBAR_Handle ahProgBar;

   // Determine which type of message was sent to the screen
   switch (pMsg->MsgId) {

   case WM_INIT_DIALOG:       // When the screen first gets created
        // Create the progress bar
        ahProgBar = PROGBAR_CreateEx(245, 70, 200, 30, pMsg->hWin, WM_CF_SHOW, PROGBAR_CF_HORIZONTAL, GUI_ID_PROGBAR0);
        break;
    ...
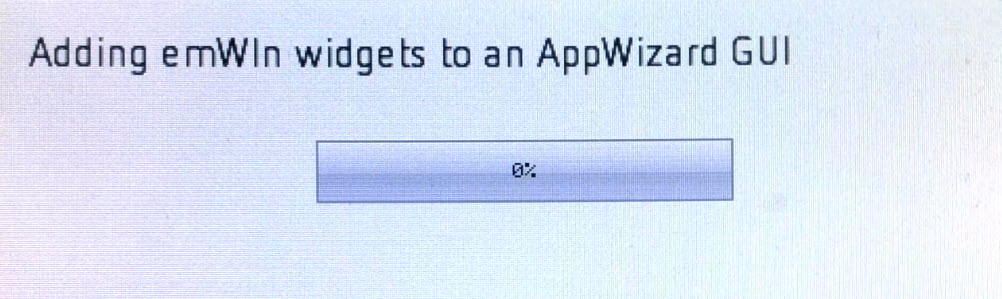
This gets our progress bar onto the screen of a target board:
(Note that the text is coming from AppWizard.)
Updating the Progress Bar
Currently, our progress bar is stuck at 0%. In order to “make some progress” and update the value of the progress bar, we can use the API call PROGBAR_SetValue().
Usually, the percentage value for the progress bar would come from some process in your application (e.g. saving data to an SD card). To simulate the value for the progress bar, we can place a slider object (e.g. ID_SLIDER_00) onto our AppWizard screen. We can then add an Interaction that updates a variable (let’s call it ID_VAR_SLIDER_VALUE) every time the slider value changes. We can also add a text object in decimal mode and add an Interaction to display the slider value on the screen.
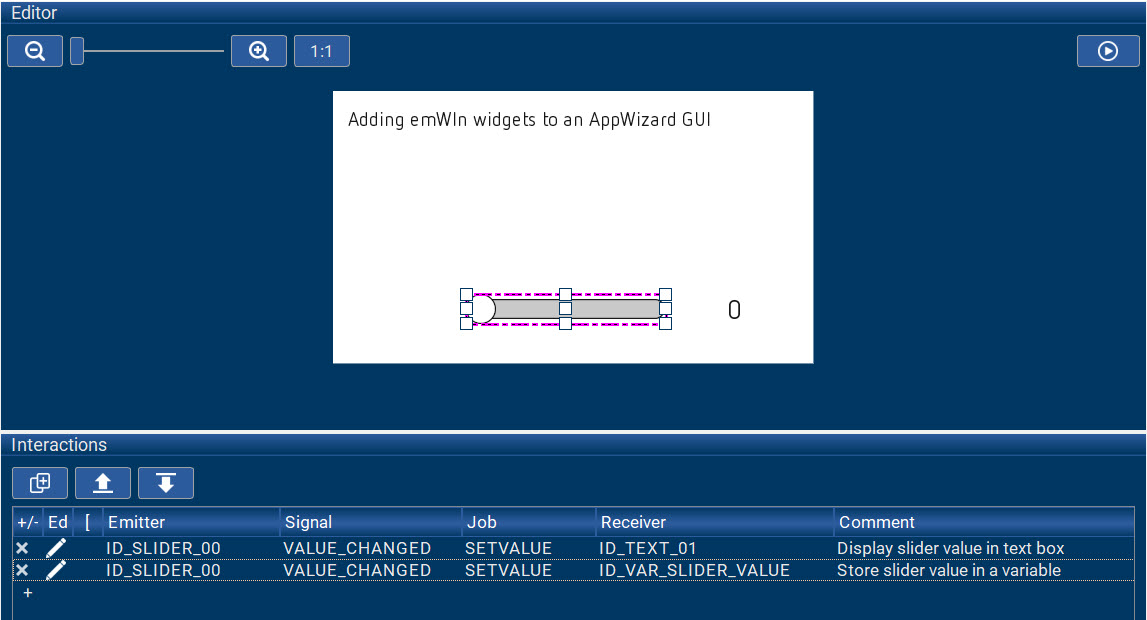
Note that the progress bar does not show up in our AppWizard editor, because we are adding it using the emWin API.
Now we can add the part of our code that updates the progress bar whenever the slider sends a message to the screen saying its value has changed:
int Id, NCode, error;
   ...

   case WM_NOTIFY_PARENT:   // When the screen gets a message from a widget

      // Determine which widget on the screen sent the message:
      Id = WM_GetId(pMsg->hWinSrc);

      // Determine which event took place:
      NCode = pMsg->Data.v;

      switch(Id) {
      case ID_SLIDER_00:
         // Get the handle to the progress bar:
         ahProgBar = WM_GetDialogItem(pMsg->hWin, GUI_ID_PROGBAR0);

         switch(NCode) {
         case WM_NOTIFICATION_VALUE_CHANGED:
            // Update the progress bar with the value of AppWizard variable ID_VAR_SLIDER_VALUE:
            PROGBAR_SetValue(ahProgBar, APPW_GetVarData(ID_VAR_SLIDER_VALUE, &error));
            break;
         }
      }
As you can see, once we determine that the WM_NOTIFY_PARENT message comes from the slider, we first use the WM_GetDialogItem() method to get the handle to the progress bar. Next, after we determine that the message we received is due to a change in value, the APPW_GetVarData() method gets us the latest value of the slider value variable. Finally, we pass that value to the PROGBAR_SetValue() method to update the progress bar.
Running on a target board, it looks like this:
Looking at the target screen, you can’t tell which screen objects were created by AppWizard and which ones we added ‘manually’ using the emWin API. And that’s exactly the point.
Using a Slot Routine to update a widget
Once you have created additional widgets in the screen callback, you can also update them via user code in the slot routines that get executed with the job of an interaction created in AppWizard. These routines are located in the same file as the screen callback (file <ScreenID>_Slots.c in the directory \CustomCode\Config\).
In our particular example, we could have added the code that updates the progress bar to the slot routine that gets executed when the value of ID_VAR_SLIDER_VALUE changes (instead of adding it to the screen callback):
/*********************************************************************
*
* ID_SCREEN_00__ID_SLIDER_00__WM_NOTIFICATION_VALUE_CHANGED
*/
void ID_SCREEN_00__ID_SLIDER_00__WM_NOTIFICATION_VALUE_CHANGED(APPW_ACTION_ITEM * pAction, WM_HWIN hScreen, WM_MESSAGE * pMsg, int * pResult) {

  PROGBAR_Handle ahProgBar;
  int error;

  // Get the handle to the progress bar:
  ahProgBar = WM_GetDialogItem(hScreen, GUI_ID_PROGBAR0);

  // Update the progress bar with the value of AppWizard variable ID_VAR_SLIDER_VALUE:
  PROGBAR_SetValue(ahProgBar, APPW_GetVarData(ID_VAR_SLIDER_VALUE, &error));
}
As you can see, doing it this way simplifies the code quite a bit because we can get rid of the switch/case statements that we needed when this code was part of the screen callback.
You can find more information on slot routines and how to use them in the AppWizard User Guide (chapter 8.1).
Summary
Using the methods described in this article, you can add any number of emWin widgets to an AppWizard screen and initialize and update them. This allows you to create a “hybrid” screen composed of elements from both AppWizard code as well as user code.
Try it out – it simply works!