This article documents the process of creating a decent-looking knob for an embedded GUI, using the new SEGGER AppWizard, which – at the time of this writing – is still under construction. I describe the hunt for suitable graphics, the tools I used to adapt them to meet my needs, and how I ended up with a usable widget that satisfies the need for both form and function.
What is the AppWizard?
No doubt about it, SEGGER emWin is the de-facto standard when in comes to Embedded GUIs. No less than 9 MCU suppliers struck a deal with SEGGER to be able to offer emWin free of charge to their customers. In order to make the creation of embedded GUIs easier, SEGGER developed a tool called ‘GUIBuilder’. However, GUIBuilder was created back in 2011, when very few embedded GUIs had a touch screen. AppWizard is the next-generation tool from SEGGER to assist emWin users in creating their touch-driven embedded GUIs.
AppWizard is still in development at the time of this writing, however, being an FAE for SEGGER (located in Silicon Valley on the US West Coast), I get to test-drive and evaluate early versions of SEGGER products. So I wanted to check out the Knob widget in the AppWizard to see if I could make a cool rotating knob or dial of some sort.
Hunting for the graphics
I didn’t want to create a dial from scratch, so Google is an obvious starting point. And there are definitely a lot of ready-to-use dial and knob type images available online, you just need to be careful not to violate any copyrights. If you have a subscription plan with stock asset sites like Shutterstock or 123RF, you’re in luck. But sometimes you can find nice graphics that are free to use as long as you adhere to the license terms.
I came across this neat ‘Dark Velvet‘ UI kit on a site called UI Cloud that includes a nice-looking dial. This work is licensed under a Creative Commons Attribution 3.0 License (see full credits on the bottom of this article). Download, extract, and out pops a .psd file. I love SnagIt from TechSmith, so I opened it up in my trusted SnagIt editor. It was time to do some editing.
Preparing the images
My intention was to run the GUI on the STM32F746G-Disco board, which has a nice 480×272 pixel screen. Therefore, I first cropped the image to that size, leaving just the dial and the sliders.
I then saved that image – that’s going to be the background.
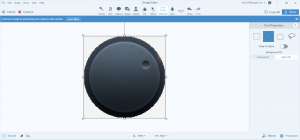
Now comes the tricky part. In order to make the dial rotate, I needed to cut out the part of the image that is the dial. Luckily, there is a round selection option:
I cut and pasted the dial into a new image with a transparent background and cropped it to the smallest size possible:
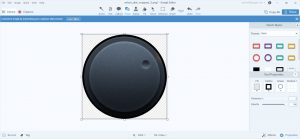
I then added a black circle to smooth out the edges and saved it as a separate image:
Putting it all together in the AppWizard
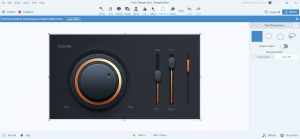
Now it was time to create the AppWizard project. The preconfigured BSPs for a variety of boards made it easy to get started. After adding a screen, a black box for a background, and the static image with the dial and the sliders, I had this:
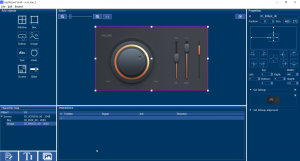
Now it was time to add the Knob widget and add the second image with just the dial as the bitmap. This required some fine tuning as the two images need to line up perfectly. AppWizard’s zoom and snap functions made it easy. I made sure the size of my knob was the exact same size (in pixels) as the image of the dial.
Once I was pretty sure I got the alignment just right, I used the handy test mode in the AppWizard for an instant check:
Not too bad!
Running it on the target
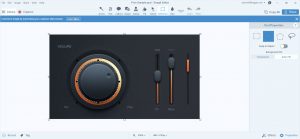
A software simulation was nice, but what would it look like on the target board?
“The proof is in the pudding,” as they say. Luckily, when you do “File | Export”, AppWizard creates a ready-to-run SEGGER Embedded Studio IDE project for the target board selected as the BSP.
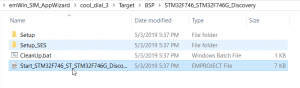
So I opened the Embedded Studio project and built it.
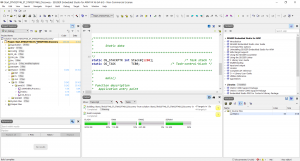
I then downloaded it into the target. Here is what it looked like:
Again, pretty good!
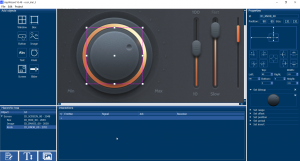
Now we can configure some more Knob parameters in AppWizard, like a range, offset, position, and a period, i.e. how quickly the dial should stop rotating when you nudge it.
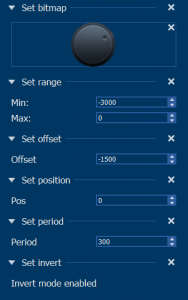
We can also add a text field and have the knob value shown on the display.
This changes the look and feel to this:
What could be better?
You may look at the spinning dial and say, well, the shading shouldn’t be rotating, just the indicator… You can do that, but you have to lift the indicator off the dial and then replace it with what the dial would look like if the indicator hadn’t been there. This is tricky if the dial has a shading.
I did it anyway and this is what it looked like:
Also, SnagIt is not the most sophisticated tool for manipulating graphics, so your results may be better if you have access to a higher-end tool.
One more example
I went ahead and did one more example, from the same web site. This one is called “Shiny Metal” UI kit. I first let the whole knob rotate like before:
I then covered up the gauge that isn’t changing and only made the indicator rotate:
Which works better? You decide.
Looking forward to the release of the AppWizard!
Credits:
“Dark Velvet” UI kit, Copyright by PixelKit, used under this license.
“Shiny Metal” UI kit, Copyright by Giuseppe Severo, used under this license.