In Part I of this three-part blog post series, I described how I had the idea of recreating one of my favorite electronic games from the early 1980s, Ravensburger’s Galaxis, on the NXP evaluation kit for the i.MX RT1052, using SEGGER tools and software. I also went over the first steps in the process: the creation of a skeleton project with AppWizard (SEGGER’s GUI design tool for the emWin graphics library), and the building and debugging of the project using the Embedded Studio IDE and J-Link debug probe. Part II is the continuation of this journey.
User-input and game-output elements
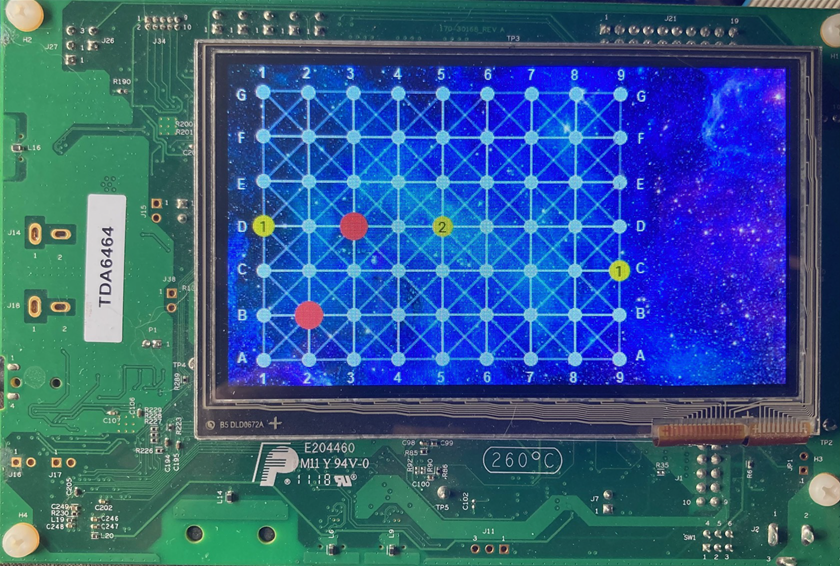
In the original Galaxis game, the players select a grid location using two dials (one for the row and one for the column) and push a button to see if the selected coordinates hold a missing ship. If no ship is found there, the four red LEDs under the small clear plastic dome indicate the number of ships that can be detected along the grid lines extending out from the chosen grid position (along with some rather obnoxious beeps). The players then place small yellow plastic markers onto the grid with the corresponding numbers on them, in order to get an idea of where the ships might be located.
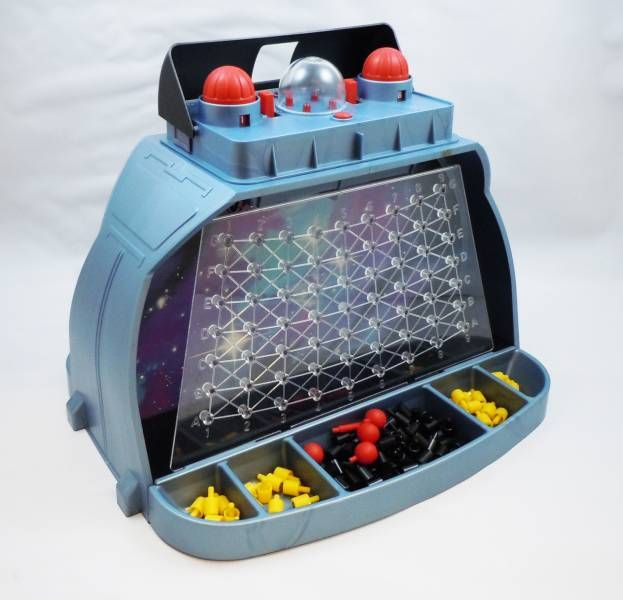
In the age of touch screens, things like real buttons, dials, and indicator LEDs are increasingly becoming a thing of the past, of course. In my implementation, users would simply have to touch a grid location to find out what’s hiding there. Time for some button objects (at least 63 of them…)!
I think this might be a suitable spot for a helpful hint: It’s a really good idea to diligently rename your objects in AppWizard from their default names to something by which you can easily identify them. Down the road, this makes things a lot easier when you add behavior to your GUI in both AppWizard and your user code (and as you add more and more objects).
For each grid location, I needed an “invisible” button (without any bitmaps), a small image for the various types of markers, and a text field to show the number of ships detected by the “buoy” at those coordinates. Every time you have such a group of objects, it’s a good idea to combine them inside a window object, as they are easier to move and duplicate.
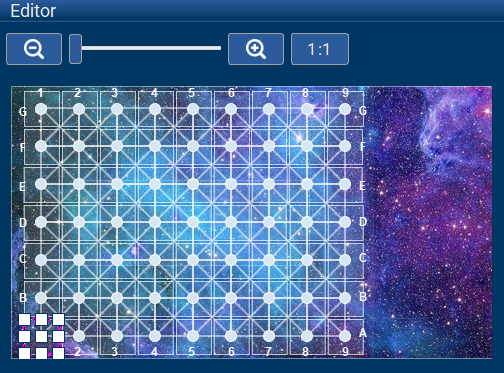
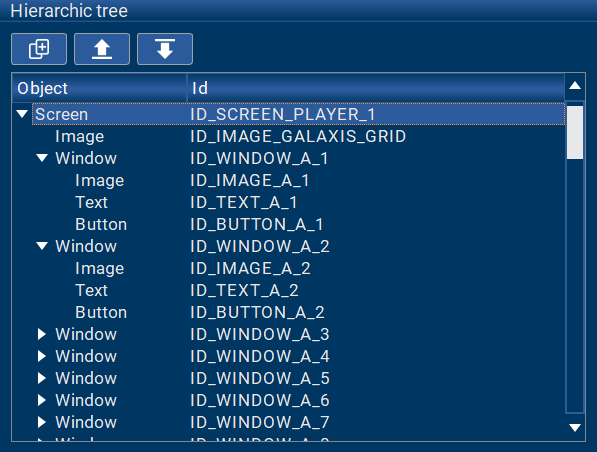
I created 63 small window objects (ID_WINDOW_A_1 – ID_WINDOW_G_9), each with their own image object (ID_IMAGE_x_y), text object (ID_TEXT_x_y), and button object (ID_BUTTON_x_y). A lot of this happened via copy-and-paste. Aligning the window objects was pretty easy, given AppWizard’s “snap-to-grid” functionality. I just needed to manually adjust the names of the objects.
Reacting to player touch events
I had done a lot of groundwork, but so far nothing was happening when one of the grid-location buttons was tapped. Now it was time to implement some behavior. This is where the interactions in AppWizard come in.
Interactions in AppWizard have an emitter, a signal, a job, and a receiver. The emitter specifies the ID of the object (e.g., ID_BUTTON_A_1) that has to send out a certain signal in order for the interaction’s job to be executed. The signal is the event (e.g., RELEASED) that has to occur for the job to be executed.
The job specifies a certain action that will be done when the signal has occurred. This could, for example, be SETTEXT in order to set the text of an Edit object. The receiver specifies the ID of the object for which the job will be executed. For example, if the job is SETTEXT, the receiver has to be an Edit object, whose text will then be set.
Depending on the interaction, some parameters might need to be defined to further specify what the action/job should do with the receiver. For example for the job ADDVALUE, the user has to specify the value that will be added to the receiver. Optionally, a condition can be set up for the interaction. This condition determines whether or not the job of the interaction will be executed.
Using interactions, you can implement some pretty advanced application functionality right there in AppWizard. However, the trick is to find the right balance between what functionality to implement via interactions in AppWizard, and what to implement in user code.
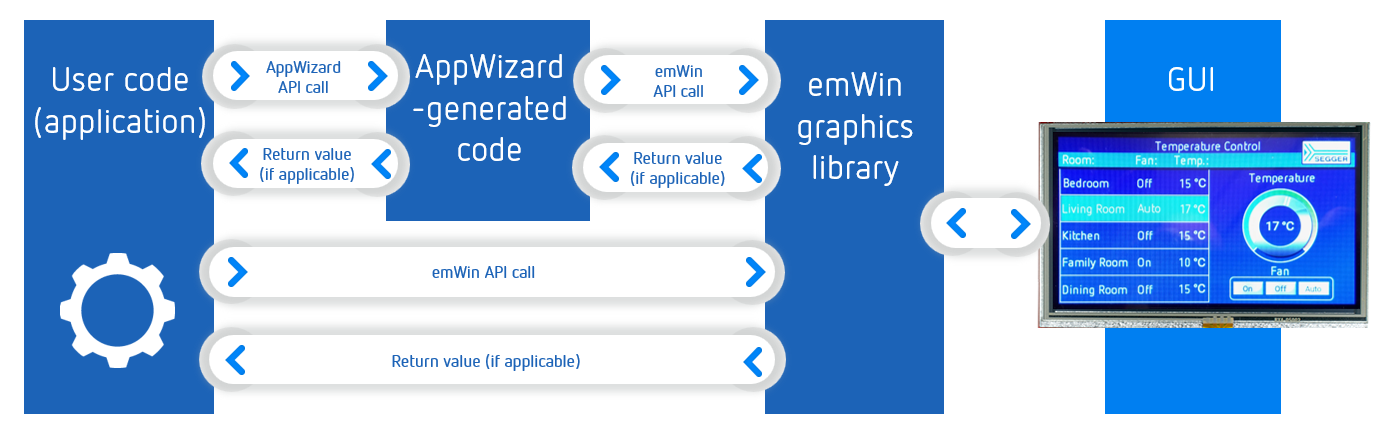
The image below gives one an idea on how user code, AppWizard-generated code, and the emWin graphics library work together to create the GUI:
In my case, if a grid location was tapped and released, I just wanted to branch into a specific section of the user code in order to then carry out the required operations there. So I added 63 interactions, one for each button:
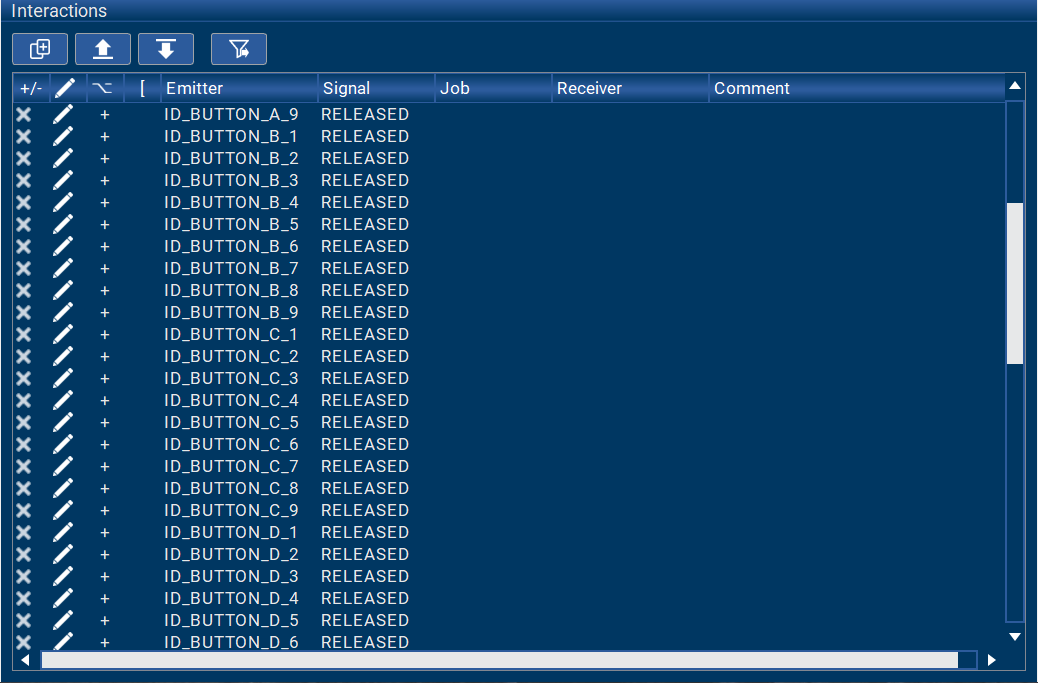
Note that when I entered these interactions, I specified NULL as the job to be done (and no receiver), as AppWizard did not need to take an action on another GUI object. (The NULL in the job column disappears later on.)
For each interaction, AppWizard generates so-called slot routines in user code. Slot routines provide a place to add user code that will be executed along with the job of an interaction (if there is one). These routines are located in the <ScreenID>_Slots.c files in the Embedded Studio project directory \AppWizard\Source\CustomCode\.
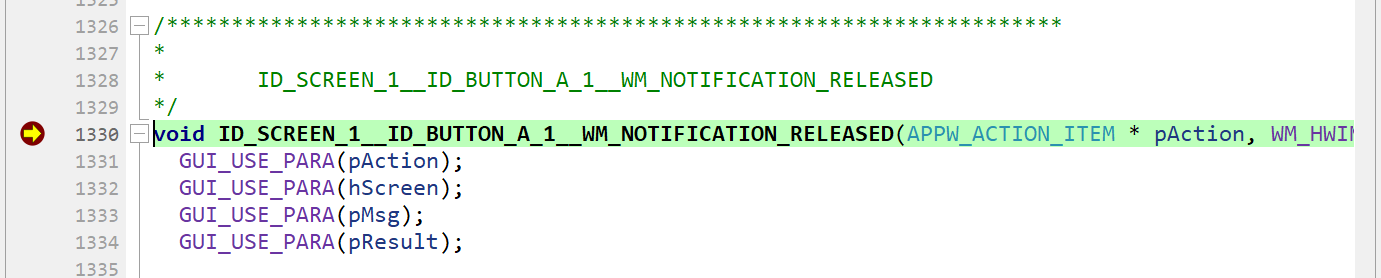
For the 63 interactions I added for the game-grid buttons, AppWizard auto-generated 63 slot routines, which looked like this:
/*********************************************************************
*
* ID_SCREEN_P1__ID_BUTTON_A_1__WM_NOTIFICATION_RELEASED
*/
void ID_SCREEN_P1__ID_BUTTON_A_1__WM_NOTIFICATION_RELEASED(APPW_ACTION_ITEM * pAction, WM_HWIN hScreen, WM_MESSAGE * pMsg, int * pResult) {
GUI_USE_PARA(pAction);
GUI_USE_PARA(hScreen);
GUI_USE_PARA(pMsg);
GUI_USE_PARA(pResult);
}

/*********************************************************************
*
* ID_SCREEN_P1__ID_BUTTON_A_2__WM_NOTIFICATION_RELEASED
*/
void ID_SCREEN_P1__ID_BUTTON_A_2__WM_NOTIFICATION_RELEASED(APPW_ACTION_ITEM * pAction, WM_HWIN hScreen, WM_MESSAGE * pMsg, int * pResult) {
GUI_USE_PARA(pAction);
GUI_USE_PARA(hScreen);
GUI_USE_PARA(pMsg);
GUI_USE_PARA(pResult);
}

[...]

/*********************************************************************
*
* ID_SCREEN_P1__ID_BUTTON_G_9__WM_NOTIFICATION_RELEASED
*/
void ID_SCREEN_P1__ID_BUTTON_G_9__WM_NOTIFICATION_RELEASED(APPW_ACTION_ITEM * pAction, WM_HWIN hScreen, WM_MESSAGE * pMsg, int * pResult) {
GUI_USE_PARA(pAction);
GUI_USE_PARA(hScreen);
GUI_USE_PARA(pMsg);
GUI_USE_PARA(pResult);
}
To test things out, I re-generated the code in AppWizard, re-built it in Embedded Studio, and started another debug session. I put a breakpoint on the slot routine for grid location A1, ran the code, tapped location A1, and — to my delight — ended up in the right slot routine, as expected:
Nice!
Reviewing the skeleton project
At this point, I felt pretty good about the idea that this project could be done in a reasonable amount of time and the thought that I definitely wanted to move forward with it. But before I could write the necessary code to implement the game, I needed to familiarize myself with the skeleton project that AppWizard provided me with for the i.MX RT1050 EVK. The image below shows the project structure in Embedded Studio, including some comments that I added:
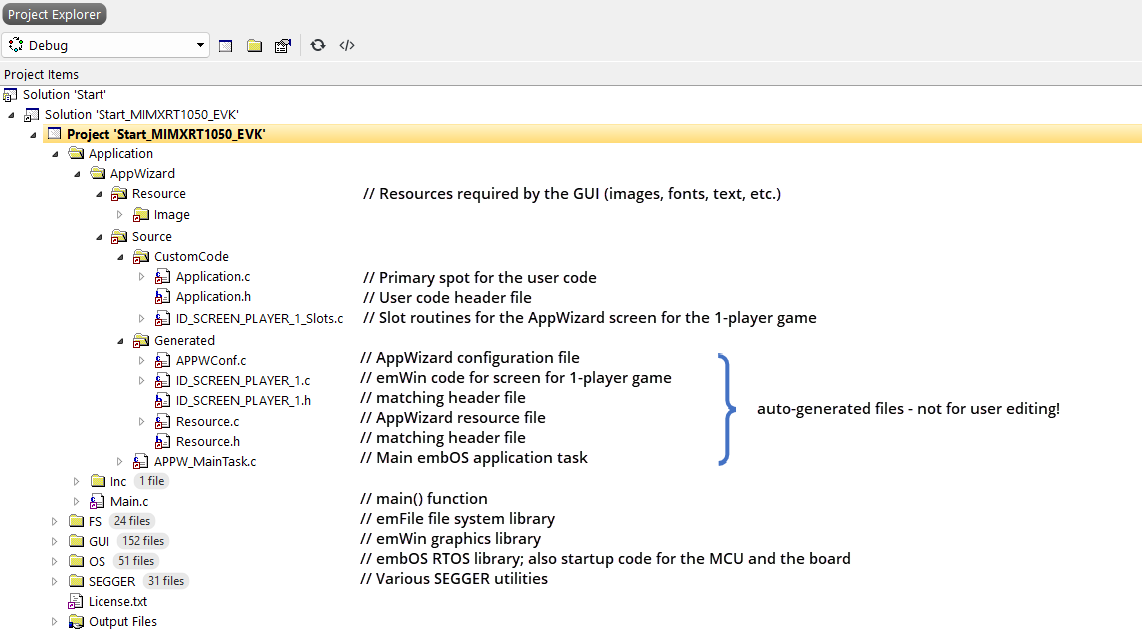
My focus clearly had to be on the files in the CustomCode folder. Pretty much everything else is auto-generated by AppWizard, which means that any edits to these files usually get overwritten every time you make edits in AppWizard and re-generate the code by performing Export & Save (which happens quite a lot during development).
Time for some user code…
Now that I had gotten a better idea of the project’s structure, it was finally time to write some user code!
To start, I added one line of code to each of the 63 button slot routines in order to pass the information about the grid location to my (yet-to-be-written) user code routine that was going to handle the evaluation of a touch event.
For example, for grid location G9:
Evaluate_Touch(0, 8, ID_TEXT_G_9, ID_IMAGE_G_9, hScreen); // evaluate the touch event on G 9
The values 0 and 8 represent the row and column of the grid location G9 (per a convention of my choosing), ID_TEXT_G_9 represents the text object at that location, and ID_IMAGE_G_9 represents the image object at that location. hScreen is a handle to the screen that holds the game grid.
I put the bulk of the code into the Application.c file to keep it separate from the AppWizard-generated code.
Key sections:
- Declaration of an empty 7×9 array to hold the four ships and the values regarding how many ships can be “seen” at each (non-ship) grid location
- A routine to generate 4 unique coordinate pairs for the ships for each new game, and to place them into the array
-
- I decided to use the true random number generator (TRNG) on the i.MX RT1052 device for this.
- The examples in the NXP SDK for the i.MX RT1052 helped a lot.
-
- A routine to calculate the grid values to be reported by the buoys (based on the location of the 4 ships) and place them into the array
-
- Not unexpectedly, this was the most time-consuming part of the project, but also one of the the most interesting.
- One important characteristic of the game that needed to be reflected here: The buoys can’t detect a ship that is behind another one. This means that if two or more ships are located along the same grid line, only the first one gets reported. The players also need to keep this in mind throughout the entire game as it can cost them the win if they don’t!
-
- A routine to evaluate the touch event at a certain grid position
-
- If a ship was found at the grid position, I set the image object at the grid position on the screen (ID_IMAGE_x_y) to the image of the ship (which was a red dot I made in SnagIt).
- If no ship was found, I set that image object to the image of a yellow marker (also done in SnagIt), and set the associated text object (ID_TEXT_x_y) to the number of ships that the buoy was reporting from the grid position (“scanning” for ships in each of the 8 possible directions).
-
In the routine to evaluate the touch event, in order to get access to the screen objects at the grid position being evaluated, I first needed to declare some object handles:
IMAGE_Handle hImage;
TEXT_Handle hText;
Then I was able to use an emWin API call to get a handle on those objects:
hImage = WM_GetDialogItem(hScreen, image_id); // get a handle to the image object at this test point
hText = WM_GetDialogItem(hScreen, text_id); // get a handle to the text object at this test point
Note that image_id and text_id got passed by the call from the slot routine for the grid location (they are ID_IMAGE_x_y and ID_TEXT_x_y, respectively). hScreen is the handle to the active screen, also passed by the call in the slot routine.
Now, I was able to load the objects with the desired content by using a combination of two emWin API calls and an AppWizard API call. Below, we see the case involving a yellow marker:
IMAGE_SetDTA(hImage, &acyellow_marker2, 1312); // set image object data to yellow marker image
TEXT_SetTextColor(hText, text_color); // set color of text object to black
APPW_SetValue(ID_SCREEN_PLAYER_1, text_id, num); // set text object to calculated search value (0..4)
While developing the software, I frequently regenerated the code in AppWizard after making little tweaks there, rebuilt the project in Embedded Studio after adding more user code, and tested things out via debug sessions on the target board. By now, fundamentally, the game was working!
That’s a wrap for Part II. In Part III, I will describe the implementation of the black markers — one more interesting element to this game that sets apart experienced players from novices, and that emphasizes strategy over luck when searching for the ships. We will also put the finishing touches on the game and wrap it up.
Stay tuned!
2 comments:
Comments are closed.