I decided to put Embedded Studio to the test:
How little flash memory could be used on a typical Cortex-M Microcontroller to toggle an LED?
The challenge was:
- to produce a stand-alone blinky that uses less than 100-bytes,
- with a toggle frequency easily visible to the human eye (i.e. the 1-5 Hz range),
- with the main program written in “C” (or C++),
- using hardware that is readily available,
- without fuzzing with or disabling the toolchain’s runtime system initialization
This article will pretty much look at every byte and every instruction required. It is a good way to understand what really happens when booting a computer, so what happens “under the hood” before main() is reached.
And to cut a long story short: Yes, it can be done in less than 100 bytes with Embedded Studio.
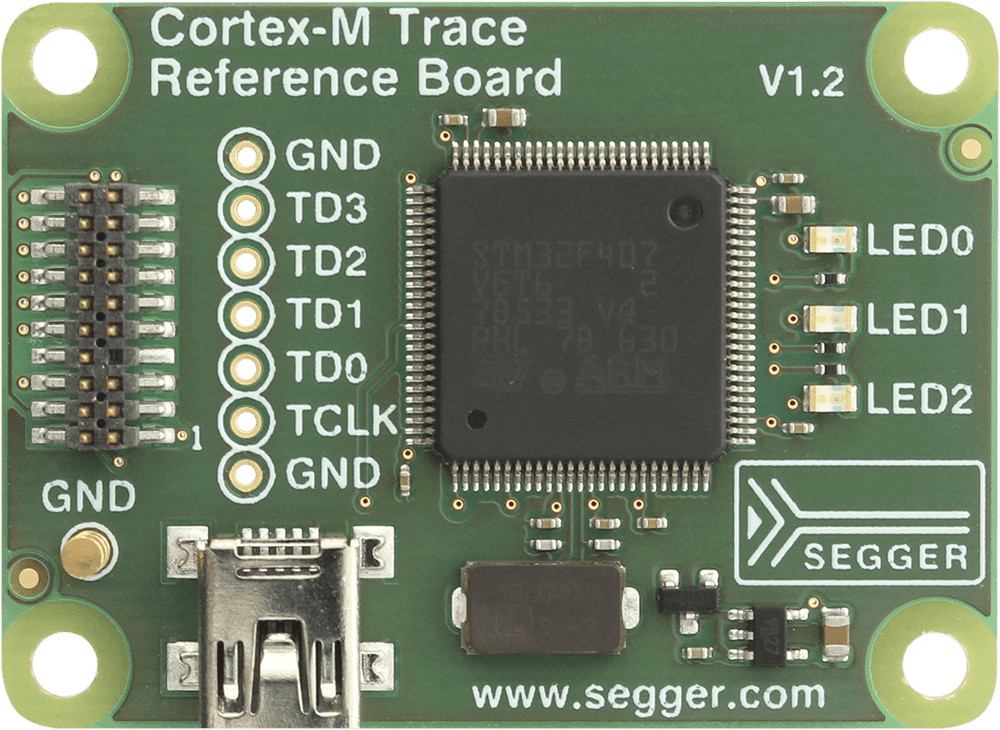
Hardware
For hardware I used our STM32 Trace Reference board.
It is a very simple board with not much more than an STM32F407 microcontroller, 3 LEDs, a debug / trace connector and a USB port that can also be used as power supply.
We ship this board with every J-Trace. Our reference project allows getting trace up in less than 10 minutes. (See video here).
However, in this case I do not care about trace. I use a regular J-Link to download the program. I just needed a board with an LED under software control, so pretty much any hardware would do.
Generating the project
Pretty easy. Selecting File -> New Project from the menu, I get to select a template. The first option, an executable for a Cortex-M CPU running from Flash, is what I want.
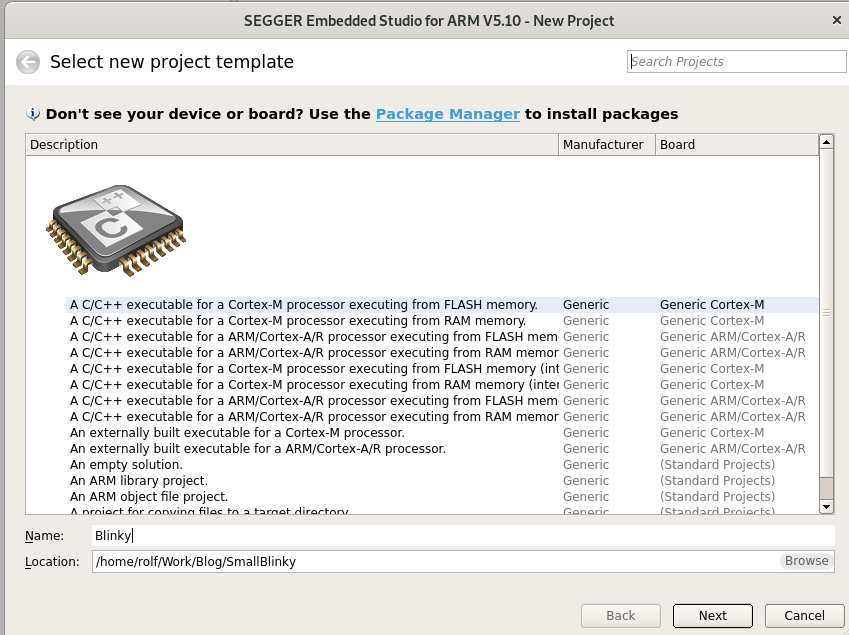
After clicking next a few times to use the defaults, I end up with a small project, as shown below in the Project Explorer Window.
Selecting Build -> Build Mini or hitting F7 builds my program.
Debug -> Go or F5 starts the debugger.
I do not have the hardware connected at this point, so Embedded Studio asks me to use the built-in simulator instead.
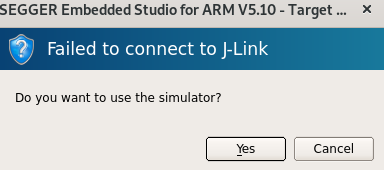
Clicking Yes or hitting Enter starts the simulator. Nice.
The debugger is set to stop at main, so this is where I am: At the start of the standard small little program, a grown up version of “Hello world”.

Now, to get started with a minimal application, let’s reduce this to basically an empty loop and see what we get.
int main(void) {
  int i;

  do {
    i++;
  } while (1);
After a build, the Output window nicely presents the memory usage.
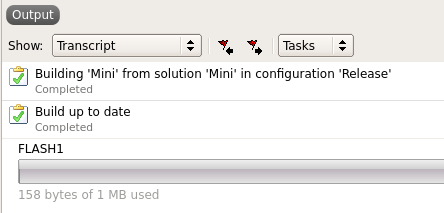
Hmmm.
158 bytes of Flash. Not bad, but I would like to understand what the memory is used for and what can be done to minimize the program, before adding the
actual blink functionality.
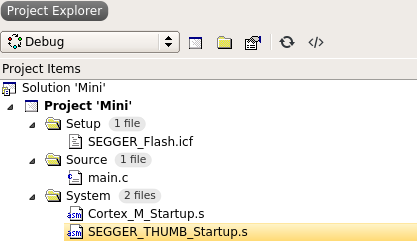
In order to do that, I can look at the Memory Usage Window, the linker map file, the ELF file that has been produced by the linker, or simply at the Project Explorer.
The Project explorer tells me that there are 3 source files which make up the executable, and how much Code+RO space they use. Note that these are the numbers for the compiler-generated object. For the final executable the linker can eliminate unused functions or might add veneers (to jump from Flash to RAM or from Thumb to ARM) and padding (for example to start on a 4 byte boundary) if necessary.
Another source of flash usage can be code that gets pulled in from libraries, such as the C Runtime Library. However, my small project does not make real use of library functions, so that does not make a big difference and becomes irrelevant.
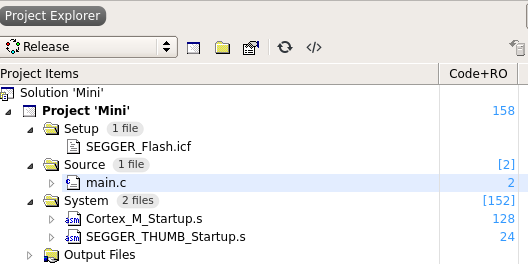
So the Project Explorer tells me the memory usage of each of the 3 sources (2, 128, and 24 bytes) and the total memory usage of the project executable: 158 bytes. This is the same number I see in the Output window. And it is the relevant number, as it takes everything into account.
Understanding the project structure
So what are the three files?
My application is just the simple main(). Why do I need the other two files?
- main.c – Our application.
- Cortex_M_Startup.s – CPU-dependent code. Contains interrupt vector table.
- SEGGER_THUMB_Startup.s – Should not need to be modified by application programmer
Let’s take a more detailed look at them to lift what’s a mystery to many people: How does startup code work?
And with that knowledge, let’s see how we can make our application smaller.
main.c
main.c contains our application, the simplest main() function.
The compiler was smart enough to see that it really does not do anything, and optimized it to an empty loop which takes just one instruction, or two bytes of code.
How do I know?
Well, we can have a look at main.o, the output produced by the compiler. In Project Explorer, right-click on main.c -> Show Disassembly or expand it and double click on main.o in Output Files.
It reveals that main is no more than one branch.

OK. This is our main application and there is no way to make it any smaller.
Cortex_M_Startup.s
Cortex_M_Startup.s contains the CPU-dependent code to make our application execute on hardware, a Cortex-M CPU in our case. It contains the interrupt vector table and the function which is executed on power up or reset: Reset_Handler.
This file uses most of flash space. Let’s take a closer look at what it produced.
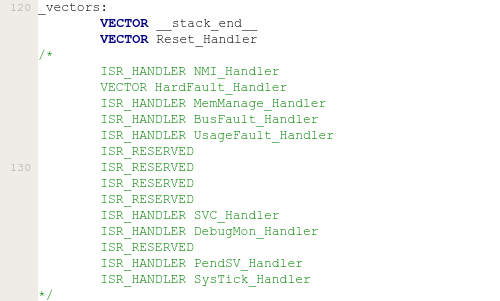
The output reveals a section .vectors, which is the interrupt vector table, and default implementations for exception handlers, which are referenced by the vector table.
section .vectors
<_vectors>
00000000 .word 0x00000000
00000000 .word 0x00000000
00000000 .word 0x00000000
00000000 .word 0x00000000
00000000 .word 0x00000000
00000000 .word 0x00000000
00000000 .word 0x00000000
00000000 .word 0x00000000
00000000 .word 0x00000000
00000000 .word 0x00000000
00000000 .word 0x00000000
00000000 .word 0x00000000
00000000 .word 0x00000000
00000000 .word 0x00000000
00000000 .word 0x00000000
00000000 .word 0x00000000

section .init.NMI_Handler
<NMI_Handler>
E7FE b 0x00000000

section .init.MemManage_Handler
<MemManage_Handler>
E7FE b 0x00000000

section .init.BusFault_Handler
<BusFault_Handler>
E7FE b 0x00000000

section .init.UsageFault_Handler
<UsageFault_Handler>
E7FE b 0x00000000

section .init.SVC_Handler
<SVC_Handler>
E7FE b 0x00000000

section .init.DebugMon_Handler
<DebugMon_Handler>
E7FE b 0x00000000

section .init.PendSV_Handler
<PendSV_Handler>
E7FE b 0x00000000

section .init.SysTick_Handler
<SysTick_Handler>
E7FE b 0x00000000

section .init.Reset_Handler
<reset_handler>
<Reset_Handler>
F7FFFFFE bl 0x00000000
F7FFBFFE b.w 0x00000004

section .init.HardFault_Handler
<HardFault_Handler>
4908 ldr r1,
680A ldr r2, [r1]
2A00 cmp r2, #0
<hfLoop>
D4FE bmi 0x00000006
F01E0F04 tst lr, #4
BF0C ite eq
F3EF8008 mrseq r0, msp
F3EF8009 mrsne r0, psp
F0424200 orr r2, r2, #0x80000000
600A str r2, [r1]
6981 ldr r1, [r0, #24]
3102 adds r1, #2
6181 str r1, [r0, #24]
4770 bx lr
E000ED2C .word 0xE000ED2C
OK, this is the culprit.
Arm has defined the first 16 entries in the vector table to be fixed, followed by device-specific entries for external interrupts.
This gives us a vector table with 16 entries, or 64 bytes, just for the table!
In our application we do not have or handle any faults or interrupt and really only need the Reset_Handler, as this is the code that starts right after reset release. We also need the first entry in the vector table, which initializes the stack pointer (SP) on reset.
So let’s eliminate all unnecessary entries, by cutting this table to just the two entries. This will also eliminate the default exception handlers.
We rebuild the application. Now we are down to 42 bytes in total. Pretty good!
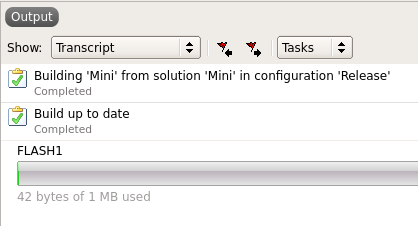
Let’s see what is actually left, by looking at the output elf file.
8 bytes @0x0000 0000: The vector table with our initial SP and pointer to Reset_Handler.
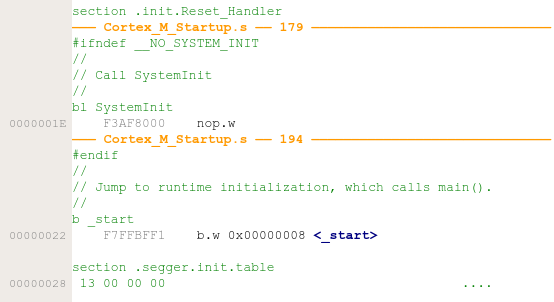
8 bytes @0x0000 001E: The Reset_Handler with just two 4-byte instructions:
A nop, which has been inserted by the linker instead of a call to SystemInit (which is not present in our application), and a jump to _start.
20 bytes @0x0000 0008: The generic runtime initialization from SEGGER_THUMB_Startup.s, which executes the linker-generated calls to initialization functions from SEGGER_init_table, then calls main, and if main ever returns stays in the exit loop.
4 bytes @ 0x0000 0028: The linker-generated SEGGER_init_table, with initialization functions that need to be called before main.
It may contain segment initialization (copy initialized data), segment fill (for 0-initialized statics or pre-filled stack), heap initialization, or constructor calls for global C++ objects. None of that is used in our application.
The final (here the only) entry is a jump to the end of runtime initialization, which then calls main.
That is 42 bytes in total, plus 2 bytes padding (@0x0000 0026) to align SEGGER_init_table.
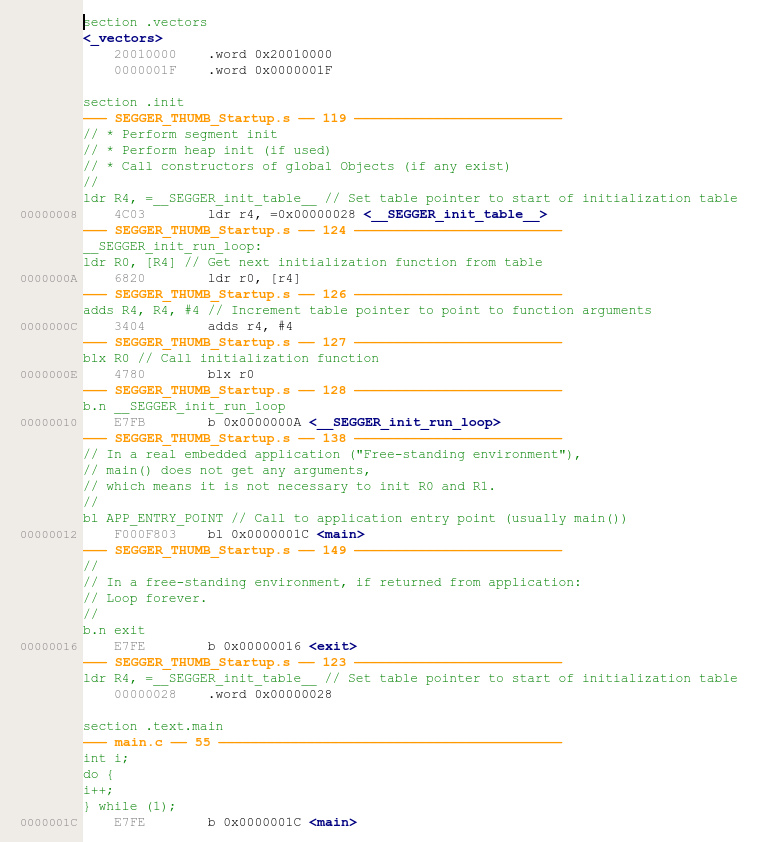
We could eliminate bl SystemInit, which is not used and replaced by a nop, to save another 4 bytes and get down to 38 + 2 = 40 bytes.
Our application is as small as possible. Let’s add the blinky code!
Adding the Blinky code
I wrote a bit of code, some one liners, to initialize and control the LEDs on the Trace Reference board, and a simple delay function.
With that code we can create the blinky main application as follows:
/****************************************
*
* main()
*
* Function description
* Application entry point.
*/
int main(void) {
  _InitLED();
  for (;;) {
    _SetLED();
    _Delay(NUM_DELAY_LOOPS);
    _ClrLED();
    _Delay(NUM_DELAY_LOOPS);
  }
}
The entire source and project is available for download.
Let’s rebuild and check the output.
Success! The total application size is only 96 bytes.
Does it actually run? Let’s give it a try. We connect the board to J-Link and J-Link to our computer. Now we run it by pressing F5. Just like at the beginning of this project, the debug session starts and runs to main, only this time on the hardware instead of the simulator.When we hit F5 again to continue execution, we can see LED0 blink.
Conclusion
Well, a blinky written in “C” can actually be put in less than 100 bytes of program (or more precisely read-only) memory.
Startup code does not have to be complicated.
All it does is initialization of the hardware (which is what SystemInit is used for), and initialization of the runtime system.
The runtime system initialization is taken care of by Embedded Studio and the SEGGER Linker. It makes sure to include only necessary code to keep the resulting executable as small as possible.
The SEGGER Linker is also capable of including specific initialization, such as heap init and call constructors, only when it is needed. This is controlled by just one line in the linker script.
initialize by symbol __SEGGER_init_heap { block heap }; // Init the heap if there is one
initialize by symbol __SEGGER_init_ctors { block ctors }; // Call constructors for global objects which need to be constructed before reaching main (if any). Make sure this is done after setting up heap.
The SEGGER Linker keeps startup code very small and easy to understand.
In combination with a good compiler, the very modular SEGGER Runtime Library and host-side formatting for printf(), that is very hard to beat.
Looking at the size of simple “Hello world” programs on a PC, maybe we should also make a SEGGER Studio available that allows generating the same small programs on a PC.
How small can you go?
Try the 100-byte blinky challenge with your toolchain!
I am convinced this will be very hard to beat, on the same hardware.
Is there more room to make the program even smaller?
Surprisingly: Yes.
First of all:
Some other microcontrollers have toggle registers which, which allows cutting the loop to just a _ToggleLED() / Delay().
Also, the amount of code required to initialize what is required varies and might be smaller on other hardware.
But even on the same hardware, we can reduce program size further.
We can put _start into the vector table, so program execution starts in the generic startup code, saving us a 4-byte jump.
We can eliminate exit() and the 2-byte branch to itself, as we know main() never returns in this program.
But less than 100 bytes is all I wanted, so let’s leave at this.
Happy coding!